關於這篇的課堂講義請看這:R Graphics with Ggplot2 - Day 2
這邊同要需要先跑下面這些 library。
|
library(ggplot2) library(dplyr) data(mpg) data(diamonds) |
同樣是用檔案資料 mpg,下面之前設好的 p1。(解說看這篇)
|
p1 <- ggplot(mpg, aes(displ, hwy)) p1 + geom_point(alpha = 1/5) |
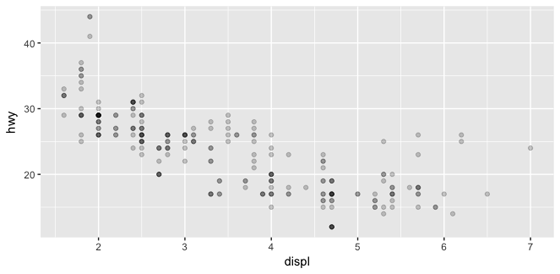
可以改變兩軸的名稱,只要在後面加這個:scale_x_continuous(" ") 和 scale_y_continuous(" "),然後在 " " 裡面打入你想要的軸名就好了。
|
p1 + geom_point(alpha = 1/5) + scale_x_continuous("Engine displacement (L)") + scale_y_continuous("Highway mileage (miles/gallon)") |
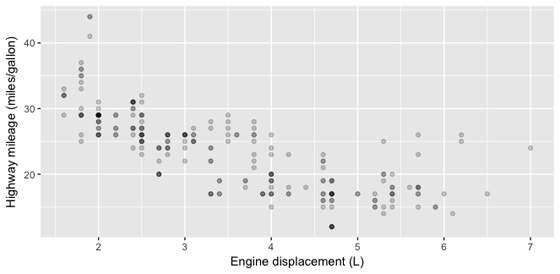
或是也可以簡單點用:xlab(' ') 和 ylab(' '),然後在 ' ' 裡面打你要的軸名。
如果要加上圖的名稱或標題,則是在加上:ggtitle(' ')
|
p1 + geom_point(alpha = 1/5) + xlab('Engine displacement (L)') + ylab('Highway mileage (miles/gallon)') + ggtitle('How engine size relates its highway mileage') |
也可以全部寫在一起:labs(x = ' ', y = ' ', title = ' ')
|
p1 + geom_point(alpha = 1/5) + labs(x = 'Engine displacement (L)', y = 'Highway mileage (miles/gallon)', title = 'How engine size relates its highway mileage') |

我們也可以設定 variable 裡面各個觀察的顏色,例如在這個例子裡,我們加入 year 這個變項,然後用顏色區分。
若要加入年份這個 variable,需要在 geom_point 裡面加入:aes(colour = factor(year)
這個指令也可以加在 p1 那層裡面,在這邊為求方便和易理解,所以加在後面。(細節解釋請看這篇和這篇)
|
p1 + geom_point(aes(colour = factor(year))) + labs(x = 'Engine displacement (L)', y = 'Highway mileage (miles/gallon)', title = 'How engine size relates its highway mileage') |
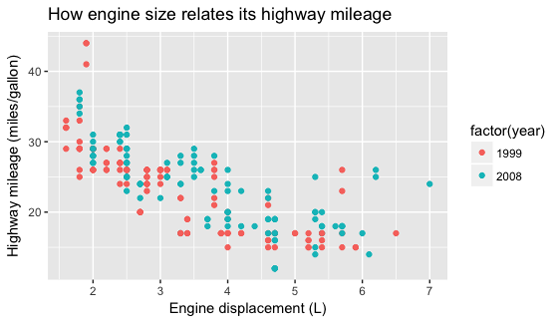
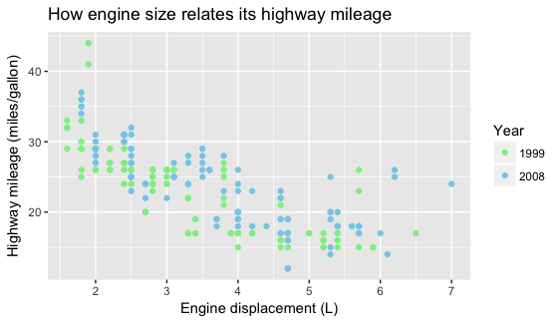
如果想指定這個年份的顏色,可以用下面的語法設定你要的顏色,也可以設定旁邊圖標(figure legend)的名稱,例如把 factor(year) 改為 Year。
scale_colour_manual(name = " ", values = c(" ", " "))
在名字的地方打入你想要的名稱,在 values = c(" ", " ") 的地方打入你要的顏色。
|
p1 + geom_point(aes(colour = factor(year))) + labs(x = 'Engine displacement (L)', y = 'Highway mileage (miles/gallon)', title = 'How engine size relates its highway mileage') + scale_colour_manual(name = "Year", values = c("light green", "skyblue")) |
除此之外,你也可以讓圖標只顯示出你要的觀察,例如說只顯示 2008 年的,並且把它改名為 To Date。
只想顯示某個觀察用:bearks =
把那個觀察改名用:labels = " "
|
ggplot(mpg, aes(hwy, cty, colour = factor(year))) + geom_point() + scale_colour_manual(name = "Year", values = c("light green", "skyblue"), breaks = 2008, labels = "To Date")) |
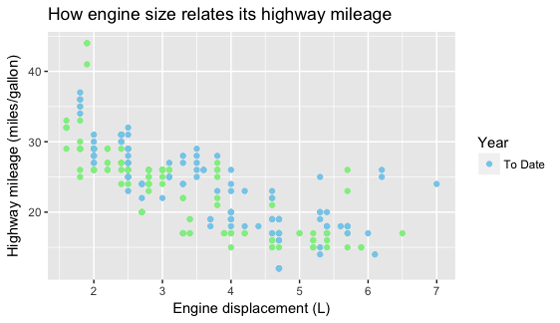
也可以改變圖標的位置,用 theme() 功能裡的 legend.position。
語法是:theme(legend.position = )
| p1 + geom_point(aes(colour = factor(year))) + labs(x = 'Engine displacement (L)', y = 'Highway mileage (miles/gallon)', title = 'How engine size relates its highway mileage') + scale_colour_manual(name = "Year", values = c("light green", "skyblue")) + theme(legend.position = 'top') |
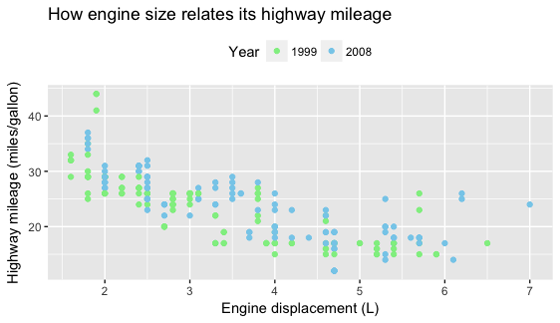
如果不要圖標,就寫 none:theme(legend.position="none")
如果要更細部的挑整圖標,可以用 guides() 的功能。
對應前面的 colour = factor(year),guides() 功能裡面用的是 colour = guide_legend()。可以在 guide_legend() 裡面設定圖標的標題、位置和格式。
設定標題的話就是直接在 guide_legend() 裡面輸入 "title" (title = 你想要的標題)。
設定位置則是用:label.position =
也可以把圖標設成兩欄的格式:ncol =
|
p1 + geom_point(aes(colour = factor(year))) + labs(x = 'Engine displacement (L)', y = 'Highway mileage (miles/gallon)', title = 'How engine size relates its highway mileage') + guides(colour = guide_legend("Year", label.position = "bottom", ncol = 2)) |
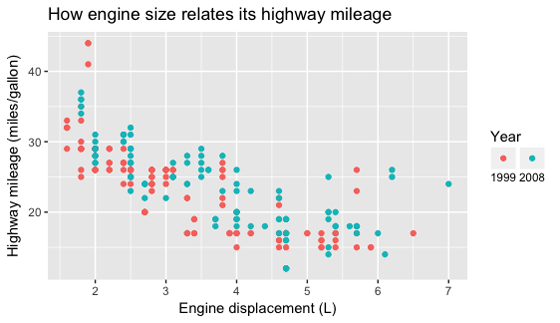
有從上面的圖中看出哪個語法是對應到哪個變化嗎?
接下來,我們用檔案資料 diamonds 來做其他改變。
在之前這一篇有畫過這個圖:
|
ggplot(diamonds, aes(carat, price)) + geom_point(alpha = 1/15) |
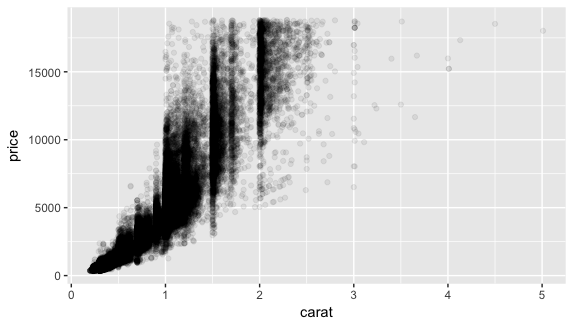
可以在其中加入另一個變項 cut,用顏色區分。
|
ggplot(diamonds, aes(carat, price, colour = cut)) + geom_point(alpha = 1/15) |
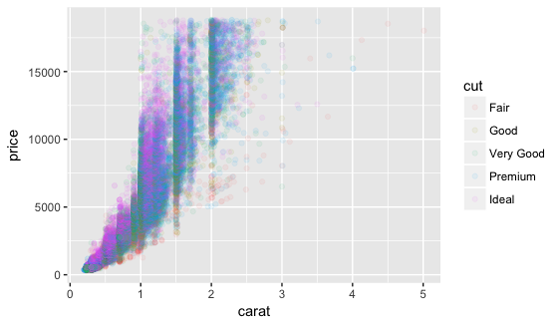
因為點太多,我們可以隨機挑出兩百個點做試驗,並把圖設為 d1。
隨機挑數的語法是:sample_n(dataframe, #)
|
d1 <- ggplot(sample_n(diamonds, 200), aes(carat, price, colour = cut)) + geom_point() |

上面的圖的 Y-axis 間隔都是相同的,我們可以把它改成倍數,也就是用 log 或是 log10。
要改軸的格式可以用上面介紹的 scale_x_continuous() 和 scale_y_continuous()。
在這兩個功能裡面可以設軸名、軸的格式、最大值和最小值,還有顯示哪幾個值。
設軸名:name = " "
設軸上各點的名字:label = c(" ", " ", " ", ...)
例如 X-axis 的標示是 2, 4, 6 的話,可以用 label = c("two", "four", "six") 這個語法改成 two, four, six。
軸的格式可以設成倍數,也就是從原本的 1, 2, 3, .... etc. 轉換成 1, 2, 4, 8, 16, ... etc,用的語法為:trans = "log" 或是 trans = "log10"
最大值和最小值:limits = c(min, max)
也可以用之前介紹過的:xlim(min, max)
只顯示某幾個值:breaks = c(x, y, z, ....)
顯示副軸(minor scale):minor_breaks = (如果沒設的話就是 default 會出現,如果不想要就設 minor_breaks = NULL。)
接下來直接用上面的圖做變化,為了清楚表現以上幾個功能,先從最少的語法開始。下面是
|
d1 + scale_x_continuous(name = "Carat", limits = c(0.2, 4), breaks = c(0.25, 0.5, 1, 2, 4), minor_breaks = NULL) + scale_y_continuous(name = "Price", breaks = 1000 * c(0.5, 1, 2, 4, 8, 16), minor_breaks = NULL) |

跟上面的比較,可以看出軸名改了,成為:Price 和 Carat。圖的橫軸變成從 0.2 到 4,軸的點為指定的那四點,各點間依比例設距離,因此畫出來會是 log 的圖。圖的直軸也只顯示設的那幾個點,數字間的距離也是依比例畫的。兩軸皆沒有副軸。
再來加入副軸,也就是把 minor_breaks = NULL 拿掉。然後讓顯示的點都為等距,也就是用 trans = "log" 的功能來畫 log 的圖。
|
d1 + scale_x_continuous(name = "Carat", limits = c(0.2, 4), trans = "log", breaks = c(0.25, 0.5, 1, 2, 4)) + scale_y_continuous(name = "Price", trans = "log10", breaks = 1000 * c(0.5, 1, 2, 4, 8, 16) |

再來,我們可以改變圖標的名稱,用的語法是:scale_colour_discrete()
| d1 + scale_x_continuous(name = "Carat", limits = c(0.2, 4), trans = "log", breaks = c(0.25, 0.5, 1, 2, 4)) + scale_y_continuous(name = "Price", trans = "log10", breaks = 1000 * c(0.5, 1, 2, 4, 8, 16) scale_colour_discrete("Cut") |

可以看到右邊圖標的名稱改了,如果想要改裡面各個小標的名稱的話,就在功能裡面加:labels = c(" ", " ", " ", ...)
最後,我們用檔案 msleep 來做個練習吧。
Exercise
1. Using the msleep data frame, plot the length of the sleep cycle versus the total amount of sleep. Indicate the animal’s diet by colour. Add appropriate labels to the axes and colour legend, and make the colour key labels more reader-friendly.
|
ggplot(msleep, aes(sleep_total, sleep_cycle, colour = vore)) + geom_point() + labs(x = "Total sleep (h)", y = "Length of sleep cycle", title = "Animal Sleep") + scale_colour_discrete("Animal Diet", labels = c("carnivore", "herbivore", "insectivore", "omnivore", "N/A")) |
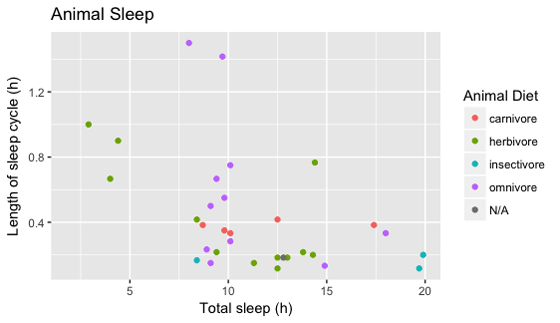
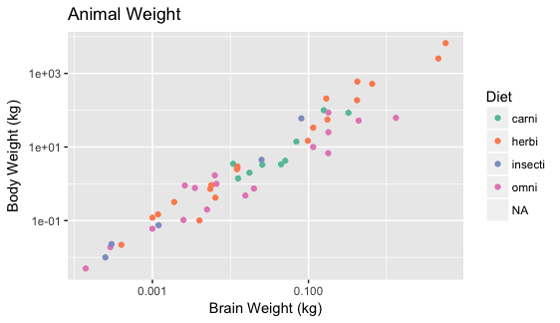
2. Using the msleep data frame, plot the body weight vs. the brain weight. Indicate the animal’s diet by colour. Add appropriate labels to the axes and colour legend. (Use a log axis if warranted.)
這邊我們會用另一個顏色的功能嘗試:scale_colour_brewer()
用法跟上面的很像,一樣是可以在裡面設定圖標名稱,另外就是這個是調色盤,也可以設定不同的色調,用的語法是:palette = " "
另外,上面介紹的 scale_x_continuous(trans = "log10") 和 scale_y_continuous(trans = "log10") 也可以用較短的 scale_x_log10() 和 scale_y_log10() 代替。
|
ggplot(msleep, aes(brainwt, bodywt, colour = vore)) + geom_point() + labs(x = "Brain Weight (kg)", y = "Body Weight (kg)", title = "Animal Weight") + scale_x_log10() + scale_y_log10() + scale_colour_brewer("Diet") |

如果沒有設定色調的話,預設是藍色。如果想用其他色調的話,可以參考這裡,下面用的是 "Set2"。
| ggplot(msleep, aes(brainwt, bodywt, colour = vore)) + geom_point() + labs(x = "Brain Weight (kg)", y = "Body Weight (kg)", title = "Animal Weight") + scale_x_log10() + scale_y_log10() + scale_colour_brewer("Diet", palette = "Set2") |
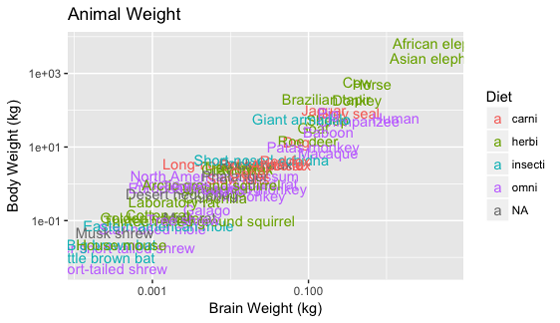
3. Same as Exercise 2, but use the species name instead of a point. Add appropriate labels to the axes and colour legend. (Use a log axis if warranted.)
這邊要把點改成動物名稱,也就是用字去顯示每個點,用的功能是:geom_text()
因為我們要用動物名稱去標示每個點,所以要加入這個指令:label = name
|
ggplot(msleep, aes(brainwt, bodywt, colour = vore)) + geom_text(aes(label = name)) + labs(x = "Brain Weight (kg)", y = "Body Weight (kg)", title = "Animal Weight") + scale_x_log10() + scale_y_log10() + scale_color_discrete("Diet") |
好了,主要的幾個功能大概都介紹了,這篇就先到這邊吧。(總算把這篇打完惹)
沒有留言:
張貼留言
歡迎發表意見